
Introduction
If you’ve recently picked up a Dash Ice Cream Maker and you’re buzzing with excitement to whip up your first batch, you’re in the right place. This guide is the ultimate flavor-packed ride through creamy, dreamy homemade ice cream magic. Whether you’re into traditional vanilla, wild about matcha, or searching for a plant-based indulgence, you’ll find everything you need in this article—from setting up your Dash Ice Cream Maker, to mastering texture, to crafting mouthwatering recipes that’ll have your friends begging for more.
But here’s the kicker—I’ve actually tried most of these recipes myself! Yep, I rolled up my sleeves, froze my mixing bowl, and churned like a dessert-loving maniac to bring you firsthand insights, tips, and those little “wish I knew that earlier” moments.
So, grab your frozen bowl and a scoop of anticipation—because this is where your homemade ice cream obsession officially begins.
Part 1: The Ultimate Guide to Dash Ice Cream Maker Recipes
Why Choose the Dash Ice Cream Maker?
When you think of small but mighty kitchen gadgets, the Dash Ice Cream Maker should sit at the top of your list. Why? Because it’s not just cute—it’s clever. Whether you’re tight on space or time, this nifty machine blends efficiency with simplicity in a way that even the busiest folks or kitchen newbies can love.
Compact Design and Efficiency
One of the standout features is its compact size. You won’t need to shuffle around your kitchen just to give it a home. It slides neatly onto a countertop or into a cupboard, and its small bowl still churns out just the right amount for small households or personal dessert nights. Plus, the bowl goes from freezer to churner in seconds—easy-peasy.
And don’t let the size fool you. It’s an efficient little beast. While some machines rattle like a freight train, this one hums quietly while working its magic in 30 minutes or less. Time to scoop? Faster than you can say “toppings, anyone?”
User-Friendly Operation
Another reason I love it? It’s almost foolproof. There’s one button. One lid. One motor. Boom—you’re ready to go. Even if this is your first foray into frozen desserts, the Dash Ice Cream Maker makes the process smooth as buttercream. No complicated manuals. No head-scratching moments. Just load, press, and churn.
And speaking of churn, let’s talk results. Whether you’re making a simple vanilla ice cream recipe or something fancier like coconut lavender gelato, the end product is always smooth, rich, and downright delightful.
Pro tip: Freeze the bowl overnight before using it. Trust me, it’s a game changer for consistency and creaminess.
👉 If you’re still on the fence about whether this gadget is worth it, this Classic Vanilla Ice Cream Recipe shows how even the simplest flavors shine when churned right.
Benefits of Homemade Ice Cream
So why go homemade when you could just head to the store and grab a pint? Well, let me lay out some scoop-worthy reasons.
Control Over Ingredients
This one’s big. Making your own ice cream means you control everything—from how much sugar goes in, to the type of milk or cream, to whether you add fresh fruits, nuts, or natural sweeteners. If you’ve got dietary preferences or food sensitivities, a homemade Dash Ice Cream Maker recipe is your golden ticket.
Want to ditch artificial colors? Done. Prefer almond milk over dairy? No prob. Have a thing for cinnamon-cardamom flavor bombs? Whip it up your way.
Cost-Effective and Fun
Let’s not forget the economics. A pint of premium ice cream can cost you upwards of $7 or more. Making a batch at home with fresh ingredients? A fraction of that price—and a whole lot more fun. Especially if you’ve got kids, partners, or friends around. It’s a family-friendly activity that ends in dessert. Win-win.
Did You Know? Homemade ice cream can be stored up to two weeks in an airtight container. But let’s be honest, who’s actually letting it last that long?
Moreover, the satisfaction of watching your creation churn into creamy perfection? Pure joy. It’s like cooking, art, and indulgence rolled into one delicious spoonful.
Part 2: Getting Started with Your Dash Ice Cream Maker
Getting started with your Dash Ice Cream Maker is a walk in the park—but it still helps to know what you’re unboxing and how to set yourself up for creamy success. So, before you dive headfirst into that vanilla bean or mango madness, let’s unpack the essentials and set the stage for a seamless first experience.
Unboxing and Setup
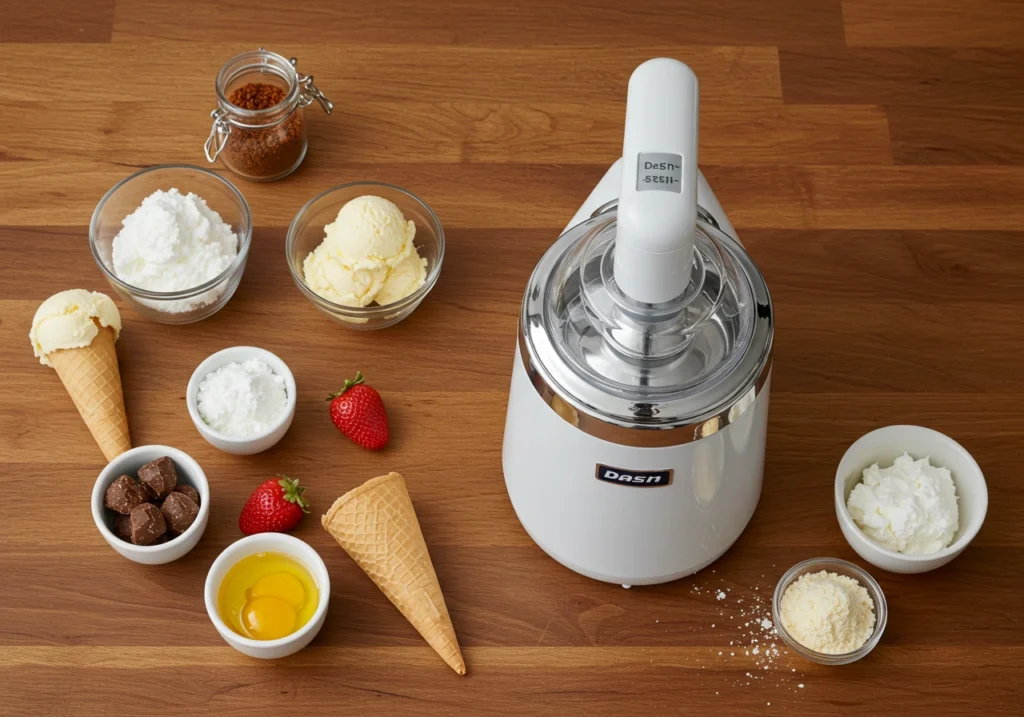
Components Included
When you first open your Dash Ice Cream Maker box, don’t be surprised if it feels a bit like a gift from the dessert gods. Inside, you’ll find everything you need to get started—no confusing extras, just practical essentials.
Here’s what you should see:
- 1 Freezable bowl: This is where the magic happens. It’s double-insulated and needs to be frozen ahead of use.
- 1 Mixing paddle (also called a dasher): It’s the tool that churns your ingredients into creamy goodness.
- 1 Motor unit with power cord: This compact motor fits neatly on top and drives the churning paddle.
- 1 Transparent lid: So you can watch the magic unfold without lifting a finger.
There’s also a user manual tucked in there, which includes basic troubleshooting and a few beginner recipes. But don’t worry, we’re going to go way beyond those.
Initial Cleaning and Assembly
Before your first batch, give each part a good rinse. It’s not about grime—it’s about removing any leftover manufacturing dust or packaging residue. Just hand wash the bowl, lid, and paddle with warm soapy water and dry them thoroughly. The motor, however, should never be submerged. Wipe it down with a soft, damp cloth instead.
Now for assembly: it’s refreshingly simple. Pop the paddle into the bowl, align the motor unit on top, and twist it until it clicks in place. Done. Seriously, that’s it.
Quick tip: Keep the packaging! It’s handy for safe storage later, especially if you don’t use the unit daily.
Operating Instructions
Freezing the Bowl
Alright, here’s the cold, hard truth: the bowl must be frozen completely before use. This step is non-negotiable. It’s the frozen walls of the bowl that turn your base into ice cream.
Most bowls need to freeze upright in the coldest part of your freezer for at least 12–24 hours. You’ll know it’s ready when you shake it and hear absolutely nothing. That means the freezing liquid inside the walls has solidified.
Pro Tip: Store the bowl in your freezer at all times if space allows. That way, you’re always ice-cream-ready.
Avoid using a half-frozen bowl; it just won’t churn properly. And sadly, no shortcuts like ice packs or freezer bags will do the trick. Trust me—I tried.
Mixing and Churning Process
Once your bowl is frozen and you’ve mixed your ice cream base, it’s go time.
Steps to follow:
- Place the frozen bowl on a flat surface.
- Insert the paddle and snap on the motor unit.
- Turn the unit on before adding your mixture. This step is important—it keeps the mixture from freezing to the bowl too quickly.
- Slowly pour in your base. Then, sit back and watch as it transforms before your eyes.
The average churning time is 20–30 minutes. The consistency you’ll get is soft-serve style, which is ideal for immediate eating. For scoopable, firm texture? Transfer it to a container and let it set in the freezer for 2–3 hours.
And yes, you can toss in mix-ins like chocolate chips or cookie crumbs during the last 5 minutes. Just don’t overload it—this baby isn’t built for mega chunky mix-ins.
Need some inspiration? Try this Buttermilk Ice Cream Idea from Serious Eats for a tangy twist on tradition.
Maintenance and Storage Tips
Cleaning After Use
Good news: cleanup is easy. After each use, wait until the bowl returns to room temperature before washing. Cold bowls can crack if hit with hot water too soon—ouch.
Here’s your routine:
- Hand-wash the bowl, lid, and paddle with mild detergent.
- Wipe the motor unit gently with a damp cloth.
- Let everything air dry before storing.
Dishwasher? Nope, not here. Dash recommends hand-washing only to maintain the unit’s integrity.
Proper Storage Practices
If you’re an ice cream fanatic like me, you’ll want to keep the bowl in the freezer 24/7. But if not, store it in a cool, dry place away from direct sunlight or extreme temperatures.
Also, keep the parts together. A small container or zip-up storage bag works wonders for the paddle and lid, so you’re not scrambling later.
Pro tip: wrap the bowl in a kitchen towel before placing it in the freezer to prevent freezer burn and frost build-up.
Part 3: Classic Dash Ice Cream Maker Recipes
Every ice cream journey deserves a solid foundation, and that’s exactly what this part is all about—nailing the classic Dash Ice Cream Maker recipes that are as foolproof as they are flavorful. Whether you’re into vanilla simplicity, chocolate decadence, or fruity flair, these crowd-pleasers are the perfect way to learn the ins and outs of your machine. And yes—I personally whipped up each of these myself, so I’m dropping in a few insider secrets along the way.
Vanilla Bean Ice Cream
Ah, vanilla—the humble flavor that somehow manages to be both simple and sophisticated. When done right, it’s rich, aromatic, and utterly crave-worthy.
Ingredients and Preparation
You’ll need:
- 1 cup whole milk
- ¾ cup granulated sugar
- 2 cups heavy cream
- 1 tbsp pure vanilla extract (or 1 scraped vanilla bean for a gourmet touch)
- Pinch of salt
Start by whisking the sugar and milk in a mixing bowl until the sugar dissolves completely. Then stir in the heavy cream, salt, and vanilla. Cover the mixture and chill in the fridge for 2–4 hours. This helps the flavors meld beautifully and ensures a smooth churn.
Optional tip: For a richer texture, add an extra ¼ cup of cream and let the mixture rest overnight.
Churning and Freezing Tips
Once your base is cold and your Dash Ice Cream Maker bowl is rock solid from the freezer, pour the mix into the churning bowl while the machine is running. Let it churn for about 25 minutes or until it resembles soft-serve.
If you want a scoopable texture, transfer it into a freezer-safe container and freeze for another 2 hours. But honestly? It’s pretty irresistible straight out of the machine.
Rich Chocolate Delight
If vanilla is the intro, then chocolate is the main event. Done right, it’s indulgent, silky, and utterly satisfying.
Selecting Quality Cocoa
The secret to a stellar chocolate ice cream lies in the cocoa. I recommend Dutch-processed cocoa powder—it’s less acidic and adds a deeper, almost brownie-like flavor. Don’t skimp on the quality. Think of it this way: if you wouldn’t eat it by the spoon, don’t use it in your ice cream.
You’ll need:
- ¾ cup granulated sugar
- 1 cup whole milk
- ½ cup unsweetened Dutch cocoa powder
- 2 cups heavy cream
- 1 tsp vanilla extract
- Pinch of salt
In a saucepan, combine sugar, cocoa, and milk. Warm it gently while whisking to dissolve the cocoa and create a smooth, chocolatey base. Cool it completely, then add cream, vanilla, and salt.
Want to level up? Add 2 ounces of melted dark chocolate into the warm mix for a double-chocolate kick.
Achieving Creamy Texture
Once chilled, pour the mix into your Dash maker and churn for 20–30 minutes. The trick for extra creaminess? Let it churn a little longer than usual—closer to 30 minutes—until it’s ultra-thick.
Also, resist the urge to overfill. Leave room in the bowl for air to whip in and create that dreamy light texture.
Strawberry Sensation
Fresh, fruity, and just a tad nostalgic, strawberry ice cream hits the sweet spot between indulgent and refreshing. It’s a total summer classic.
Using Fresh vs. Frozen Berries
Fresh strawberries? Yes, please. They give you a naturally sweet flavor and a soft texture that melts into the cream. However, frozen strawberries work too—just thaw them and drain any excess juice so your base isn’t too watery.
Ingredients:
- 1½ cups fresh strawberries (hulled and mashed)
- ¾ cup sugar
- 1 cup whole milk
- 2 cups heavy cream
- 1 tsp lemon juice
- 1 tsp vanilla extract
First, mash the strawberries with half the sugar and let them sit for 20–30 minutes. This step pulls out the juices and intensifies the flavor.
Then, mix the rest of the sugar with milk until dissolved. Stir in cream, lemon juice, vanilla, and the macerated strawberries.
Enhancing Flavor Naturally
Lemon juice might seem odd in an ice cream base, but it’s the secret weapon here. It lifts the berry flavor and balances the sweetness, making each bite bright and refreshing.
Churn for 25 minutes. If you’re into texture, toss in some chopped strawberries in the last 5 minutes. It adds a fresh, pulpy bite that’s hard to resist.
Craving something even more elevated? Check out this Epicurious Blueberry Ice Cream and swap berries for a twist.
Part 4: Innovative and Unique Flavors
Once you’ve mastered the classics, it’s time to step into the world of creative confections—where you infuse bold ingredients, explore cultural flavors, and impress your friends with your dash-worthy imagination. These innovative Dash Ice Cream Maker recipes aren’t just trendy—they’re surprisingly simple to make and wildly flavorful. I tested each of these myself, and let me tell you—they were next-level good.
Matcha Green Tea Ice Cream
Smooth, earthy, and slightly bitter in the best way possible, matcha ice cream is a modern favorite that blends Japanese tradition with creamy indulgence.
Health Benefits of Matcha
Matcha isn’t just a pretty green powder—it’s loaded with antioxidants, particularly EGCG, which is known for fighting inflammation and boosting metabolism. Plus, it delivers a calm, focused energy thanks to a balanced mix of caffeine and L-theanine.
It’s a wonderful ingredient for those who want their sweet treats to come with a side of wellness.
Here’s what you’ll need:
- 1 cup whole milk
- 2 cups heavy cream
- ¾ cup sugar
- 1½ tbsp culinary-grade matcha powder
- ½ tsp vanilla extract
- Pinch of salt
Whisk the matcha with warm milk to dissolve the powder fully and avoid clumps. Then combine all the ingredients, chill, and pour into your Dash maker.
Balancing Bitterness and Sweetness
Matcha has a naturally bitter undertone, so striking the right balance with sweetness is key. I found that ¾ cup sugar was perfect—not too sweet, not too grassy.
Optional: Add a drizzle of sweetened condensed milk for extra richness and a silky finish.
Churn for 25–30 minutes until thick and velvety. The final product? A zen-like, creamy experience that feels like a hug in every spoonful.
Lavender Honey Bliss
Want something a little floral, subtly sweet, and luxuriously creamy? Enter lavender honey ice cream—a treat that tastes like a summer garden in full bloom.
Infusing Floral Notes
Lavender, when used right, adds a gentle aroma and soothing flavor. But go overboard, and you’re in “grandma’s soap” territory. Use culinary-grade dried lavender, and steep it in hot milk for 5–7 minutes, then strain.
Here’s your ingredient list:
- 1 cup whole milk
- 2 cups heavy cream
- ¾ cup honey
- 1 tbsp dried culinary lavender
- ½ tsp vanilla extract
- Pinch of salt
After infusing and straining the lavender milk, mix in honey, cream, and vanilla. Chill the base, then churn it to dreamy perfection.
Pairing with Complementary Ingredients
This flavor pairs amazingly well with lemon zest or a swirl of blueberry compote. Just add them in during the final 5 minutes of churning for beautiful color and contrast.
Pro tip: A sprinkle of crushed pistachios on top adds both crunch and color. Chef’s kiss.
Spiced Chai Cream
Warming, spiced, and deeply comforting, chai ice cream is like your favorite winter tea turned into a silky frozen dessert. And wow—this one was unexpectedly addictive.
Crafting the Perfect Spice Blend
You can use pre-made chai tea bags, but crafting your own spice blend takes it to another level. Here’s a basic combo:
- 1 cinnamon stick
- 4 cardamom pods
- 1 star anise
- 5 black peppercorns
- 1 tsp fresh grated ginger
- 2 cloves
Simmer the spices in milk for 10 minutes, strain, and then add your remaining ingredients:
- 1 cup whole milk
- 2 cups heavy cream
- ¾ cup brown sugar (adds a rich, molassesy depth)
- 1 tsp vanilla
- Pinch of salt
Tips for a Smooth Finish
Always strain the milk after spice steeping to remove any gritty bits. Chill thoroughly before churning to ensure a smooth, even consistency.
Optional luxury: Fold in a few crumbles of spiced cookies during the last few minutes of churning for added texture.
Let it churn for 25–30 minutes. What you get is a perfectly balanced fusion of sweet and spicy—ideal for cozying up with even on warmer days.
Part 5: Dairy-Free and Vegan Options
Gone are the days when dairy-free meant sacrificing flavor or texture. These vegan Dash Ice Cream Maker recipes deliver the same creamy bliss—with a plant-based twist. I’ve tested these out myself (yes, multiple times!), and they’re shockingly good. Whether you’re lactose-intolerant, vegan, or just want a break from cream, these dreamy delights won’t disappoint.
Coconut Milk Vanilla Ice Cream
This one’s an absolute gem. It’s rich, fragrant, and so smooth you won’t even notice it’s dairy-free.
Choosing the Right Coconut Milk
Not all coconut milks are created equal. For this recipe, always go with full-fat canned coconut milk—not the watery stuff in cartons. You need that thick cream layer to mimic the mouthfeel of traditional ice cream.
What you’ll need:
- 2 cans full-fat coconut milk (chilled overnight)
- ¾ cup maple syrup or agave
- 1 tbsp vanilla extract
- Pinch of salt
Skim the thick cream off the top of each can and whisk with the syrup, vanilla, and salt. If it’s too thick, add a splash of the remaining liquid from the can to loosen it.
Sweetening Naturally
Maple syrup, agave, or even date syrup are excellent choices. They blend smoothly and add depth without overpowering the delicate vanilla flavor.
Quick tip: Chill the mixture before churning for a firmer texture. Coconut milk freezes differently, so this extra step helps immensely.
Almond Butter Chocolate Swirl
Nutty, chocolatey, and wildly indulgent, this flavor gives off strong “gourmet scoop shop” vibes—and it’s totally vegan.
Incorporating Nut Butters
Almond butter adds not just creaminess but a slightly roasted flavor that pairs beautifully with chocolate. Make sure it’s unsweetened and runny, not stiff or dry.
Here’s what you’ll need:
- 1½ cups almond milk (unsweetened)
- 1 can full-fat coconut milk
- ¾ cup almond butter
- ½ cup maple syrup
- 1 tsp vanilla extract
- Pinch of salt
- ¼ cup vegan chocolate sauce (for swirling)
Blend all ingredients except the chocolate sauce until smooth, then chill.
Creating a Swirl Effect
Pour the base into the Dash Ice Cream Maker and churn for 25 minutes. Just before it’s done, drizzle in your chocolate sauce. Don’t stir too much—you want visible ribbons for that signature swirl effect.
Pro move: Use melted vegan dark chocolate + coconut oil for a homemade magic shell-style swirl.
Banana Nice Cream
Let’s talk about the easiest, healthiest, most banana-forward dessert ever.
One-Ingredient Wonder
That’s right—all you need is ripe, frozen bananas. Slice and freeze them for at least 3–4 hours, then toss them into a food processor or blender until they form a soft-serve consistency. It’s creamy, sweet, and shockingly good for something with zero added sugar.
However, if you want to take it up a notch, transfer the smooth mixture into your Dash Ice Cream Maker for 15 minutes of churning. It firms up beautifully and mimics traditional ice cream even more.
Adding Mix-Ins for Variety
This recipe is a perfect blank canvas. Here are some fun, flavorful mix-ins:
- Mini dark chocolate chips
- Peanut butter or almond butter
- Cinnamon and chopped walnuts
- Coconut flakes or a splash of vanilla
Toss in any of these toward the end of the churn cycle for the best distribution.
Insider tip: Add a dash of vanilla and a pinch of salt to bring out the banana’s natural sweetness.
Part 6: Fruity and Refreshing Recipes
Nothing screams cool and clean like a fresh fruit-based frozen treat. These Dash Ice Cream Maker recipes lean on nature’s candy—mangoes, berries, citrus, and even florals—to bring a refreshing pop of flavor without the heaviness of cream-based desserts. I made all three of these myself (more than once), and they’re hands-down my go-to when I want something light yet indulgent. Best part? They’re naturally dairy-free and so vibrant in color and taste, they’ll look amazing on your Instagram feed too.
Mango Sorbet
This tropical delight is sweet, creamy, and oh-so-smooth. Perfect for sunny afternoons or those times when you just need a vacation in a bowl.
Selecting Ripe Mangoes
Here’s the trick: use Ataulfo or Alphonso mangoes if you can find them. They’re smaller, buttery soft, and packed with natural sugars. Ripe mangoes should be slightly soft to the touch and smell sweet at the stem.
Ingredients:
- 3 large ripe mangoes (peeled and chopped)
- ½ cup water
- ¼ cup agave syrup or honey
- 1 tbsp lime juice
- Pinch of salt
Blend everything until silky smooth, chill for 1–2 hours, and then churn.
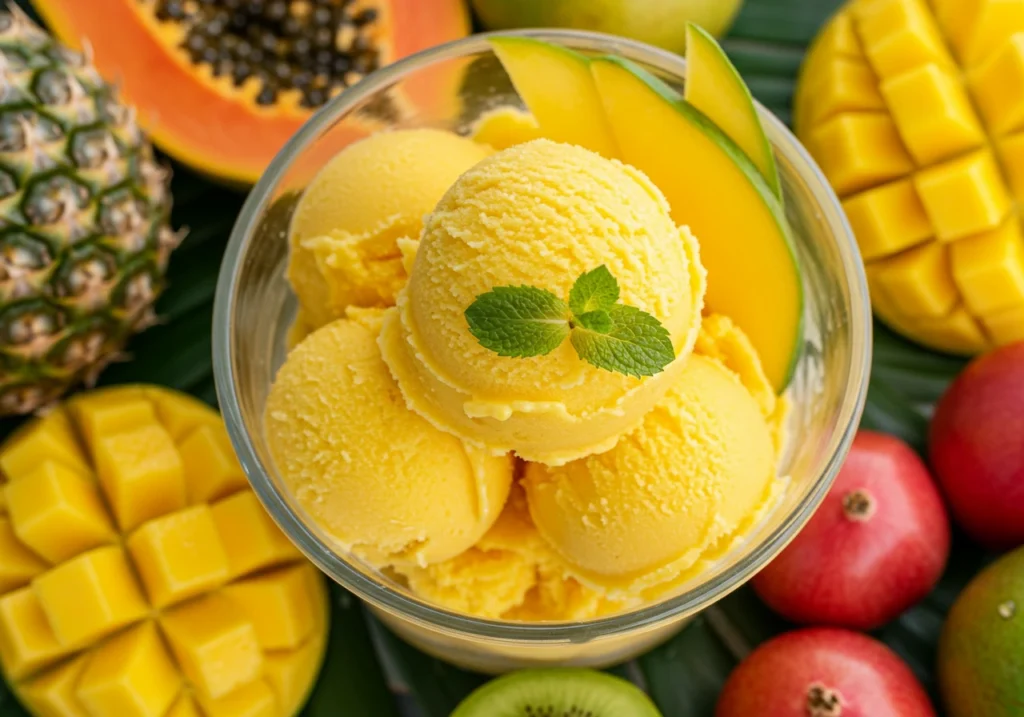
Achieving the Right Consistency
Sorbet doesn’t have the fat of ice cream, so it can freeze hard. The trick is to blend the mango mixture until it’s super smooth before chilling. If your sorbet comes out too icy, add a tablespoon of corn syrup or a splash of alcohol-free glycerin to keep it scoopable.
Pro tip: Add chopped mango in the last 5 minutes for a burst of texture and surprise in every bite.
Blueberry Lemon Zest
Vibrant and punchy, this combo is all about the bold contrast between tangy citrus and sweet, jammy berries.
Balancing Tart and Sweet
Blueberries have a natural sweetness that works beautifully with the bright zing of lemon. But every batch of berries is different, so taste your blend before freezing. If it’s too tart, add a splash more agave; too sweet, a dash more lemon juice does the trick.
Ingredients:
- 2 cups fresh or frozen blueberries
- ⅓ cup sugar or agave
- ¾ cup water
- 2 tbsp lemon juice
- 1 tsp lemon zest
- Pinch of salt
Simmer the berries with sugar and water for 10 minutes, then blend until smooth. Stir in lemon juice and zest, chill the base, then churn.
Enhancing with Citrus Zest
Lemon zest isn’t just for garnish—it brings an intense aroma and fresh taste that elevates this dessert. I even added a tiny bit of zest at the end of the churn to keep the flavor lively and bright.
Want it extra pretty? Garnish with whole blueberries and lemon curls before serving.
Raspberry Rose Delight
Raspberries meet romance in this delicate, floral-forward sorbet that feels fancy but takes just minutes to prep.
Infusing Floral Flavors
To infuse rose into your sorbet, use rose water, not rose essence (which can be too strong). A little goes a long way—½ tsp is usually perfect for a floral undertone without overpowering the berries.
Here’s what you’ll need:
- 2 cups fresh raspberries
- ½ cup water
- ⅓ cup sugar
- ½ tsp rose water
- 1 tbsp lemon juice
- Pinch of salt
Blend the raspberries and strain through a fine mesh to remove seeds. Stir in the rest of the ingredients, chill the mix, and let your Dash Ice Cream Maker do the rest.
Pairing with Fresh Berries
Once churned, fold in some chopped raspberries for a burst of texture and brightness. This is where fresh fruit really shines. It turns every bite into a beautiful blend of bold and delicate.
Bonus points: serve in a chilled glass with edible rose petals for that elegant touch.
Part 7: Indulgent and Decadent Creations
This section? Pure indulgence. These decadent Dash Ice Cream Maker recipes are for days when only the richest, creamiest, most over-the-top flavors will do. I’ve personally churned through each of these heavenly combos, and let’s just say—I didn’t stop at one scoop. From peanut butter swirls to toasted nuts and gooey fudge ripples, this is where dessert dreams go deluxe.
Peanut Butter Fudge Swirl
Sweet, salty, and deeply satisfying, this is the kind of ice cream that disappears faster than you can say “second scoop.”
Combining Sweet and Salty
Peanut butter ice cream works because it taps into that magical contrast of rich and savory with just enough sweetness to keep it dessert-worthy. Use a natural, creamy peanut butter for smooth blending and a more authentic flavor.
Ingredients:
- 1 cup whole milk
- 2 cups heavy cream
- ¾ cup sugar
- ¾ cup creamy peanut butter
- 1 tsp vanilla extract
- Pinch of sea salt
- ¼ cup fudge sauce (homemade or store-bought)
Whisk everything (except the fudge) until smooth. Chill the base thoroughly, then churn.
Creating a Fudge Ripple
The swirl is where the magic happens. Once the churning ends, layer the ice cream and fudge sauce in a container—spoon, swirl, repeat. Don’t mix too much; the ribbons should ripple through like veins of molten chocolate.
Optional: Top with crushed pretzels before serving for an extra crunch.
Cookies and Cream Dream
Nothing beats the nostalgic bliss of cookies and cream. It’s like childhood in a bowl—only better, because you made it yourself.
Choosing the Right Cookies
Oreo-style sandwich cookies are the gold standard, but there’s room to play. I tried chocolate cream-filled wafers and even vanilla sandwich cookies—both rocked. Just make sure they’re crisp and not overly soft.
Ingredients:
- 2 cups heavy cream
- 1 cup whole milk
- ¾ cup sugar
- 1½ tsp vanilla extract
- 10–12 sandwich cookies (roughly chopped)
Mix the milk, cream, sugar, and vanilla until smooth. Chill, then churn for 20–25 minutes.
Maintaining Crunchiness
Here’s the key: don’t add cookies too early. Toss them in during the last 5 minutes of churning to maintain that perfect crunch and keep the cream base from turning gray.
Pro tip: Reserve a few extra cookies for topping. Crumble them over each scoop just before serving for that bakery-style look.
Caramel Pecan Perfection
This one’s a showstopper. It’s buttery, nutty, and laced with ribbons of caramel—everything you want in a decadent frozen dessert.
Making Homemade Caramel
You can use store-bought caramel, but making it from scratch is worth every second. Melt 1 cup sugar in a saucepan over medium heat until it’s golden, then whisk in ½ cup heavy cream and a pinch of salt. Let it cool before swirling.
Base ingredients:
- 2 cups heavy cream
- 1 cup whole milk
- ¾ cup brown sugar
- 1 tsp vanilla extract
- Homemade caramel sauce
- ½ cup chopped pecans
Whisk the cream, milk, and brown sugar until dissolved. Chill, then churn.
Toasting Nuts for Flavor
Toasting the pecans brings out their richness and adds a slightly smoky depth that pairs beautifully with caramel. Just toss them in a dry skillet for 5 minutes, stirring until fragrant.
Once churned, layer the ice cream with caramel sauce and pecans. Gently swirl for that irresistible marbled effect.
Part 8: Frequently Asked Questions
No matter how simple the Dash Ice Cream Maker is to use, there are always a few questions that bubble up when you’re standing in the kitchen with a frozen bowl and a craving. I’ve been there—trying to figure out why my churn took too long, or how to nail that perfect creamy texture on the first try. So here’s a roundup of the most common questions people ask (yes, pulled straight from the “People Also Ask” section) along with clear, practical answers from personal experience and a few expert tips.
How long to churn ice cream in Dash?
Great question—and honestly, it depends a little on what you’re making. On average, 20 to 30 minutes is the sweet spot for most recipes using the Dash Ice Cream Maker.
Soft-serve consistency usually happens at around the 20-minute mark. For thicker textures or recipes with a higher fat content, letting it go up to 30 minutes gives you that rich, creamy finish.
Pro tip: If your mixture isn’t thickening after 30 minutes, your bowl likely wasn’t frozen long enough. Pop it back in the freezer for 24 hours and try again.
How to make frozen yogurt in Dash My Mug ice cream maker?
Making frozen yogurt in the Dash My Mug Ice Cream Maker is just as easy—and super satisfying.
Here’s a basic step-by-step:
- Mix ½ cup Greek yogurt, 1–2 tbsp honey or maple syrup, and ½ tsp vanilla extract in a bowl.
- Chill the mixture for at least an hour.
- Pour into your pre-frozen Dash Mug bowl.
- Churn for 10–15 minutes until it reaches a soft-serve texture.
Add-ins like berries, mini chocolate chips, or granola can go in during the final few minutes of churning.
Want it firmer? Freeze for an additional hour after churning.
What is the secret ingredient to ice cream?
The truth? There’s not just one. But if I had to name a secret weapon, it would be salt—and not just in the base.
A pinch of salt in your mix enhances sweetness, balances flavors, and deepens richness, especially in chocolate and caramel recipes.
Other sneaky upgrades include:
- A spoonful of cream cheese for smooth texture
- A splash of corn syrup for scoopable consistency
- Using powdered milk to reduce iciness
It’s the tiny tweaks that turn good ice cream into great ice cream.
How do you use an ice cream maker step by step?
Using a Dash Ice Cream Maker is beautifully simple, but let’s break it down so you feel totally confident:
Step-by-Step Guide:
- Freeze the bowl overnight (at least 12–24 hours).
- Prep your mixture ahead of time and chill it thoroughly.
- Place the frozen bowl on a flat surface and insert the paddle.
- Attach the motor unit and turn it on before adding the mixture.
- Slowly pour in the base and churn for 20–30 minutes.
- Check texture—when it looks like soft-serve, you’re done!
- Transfer to a container if you want a firmer set and freeze for 2–3 more hours.
And that’s it—no rock salt, no hand cranking, no guessing.