
Introduction
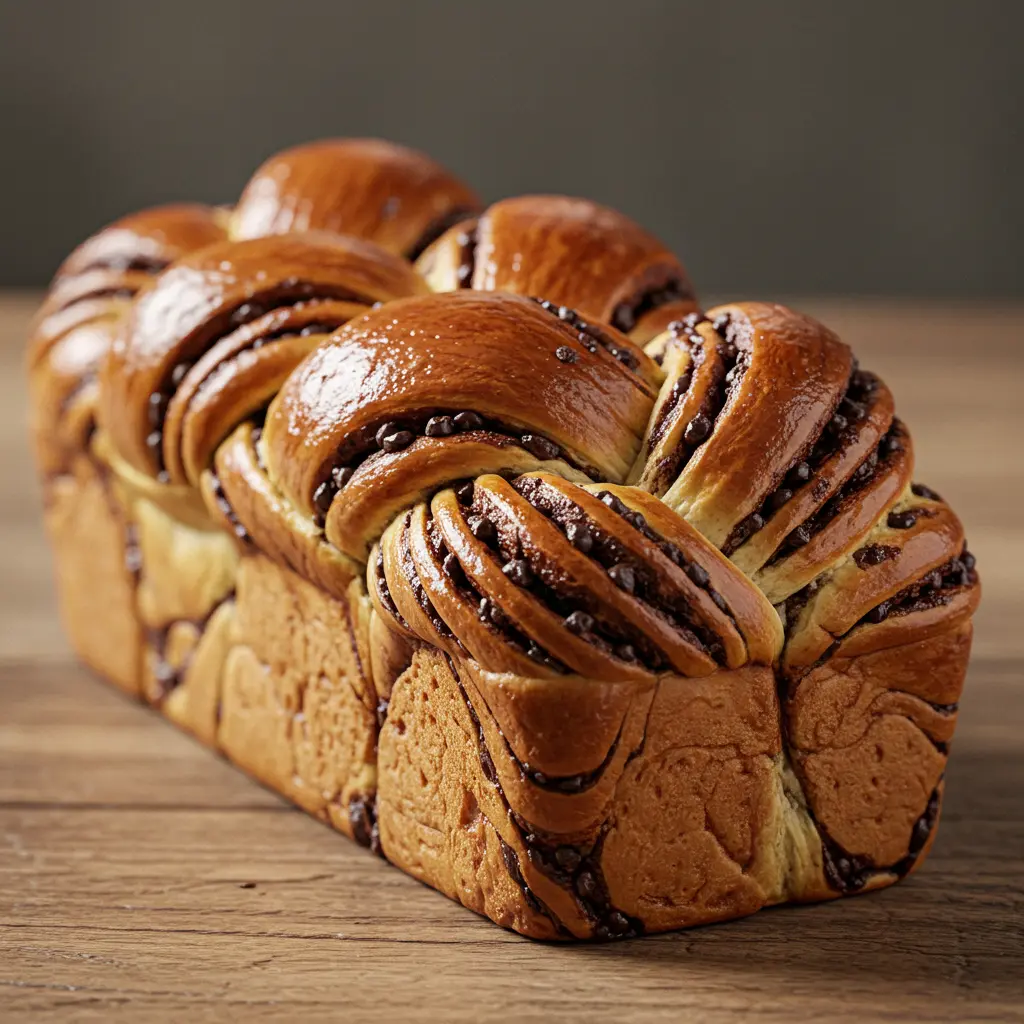
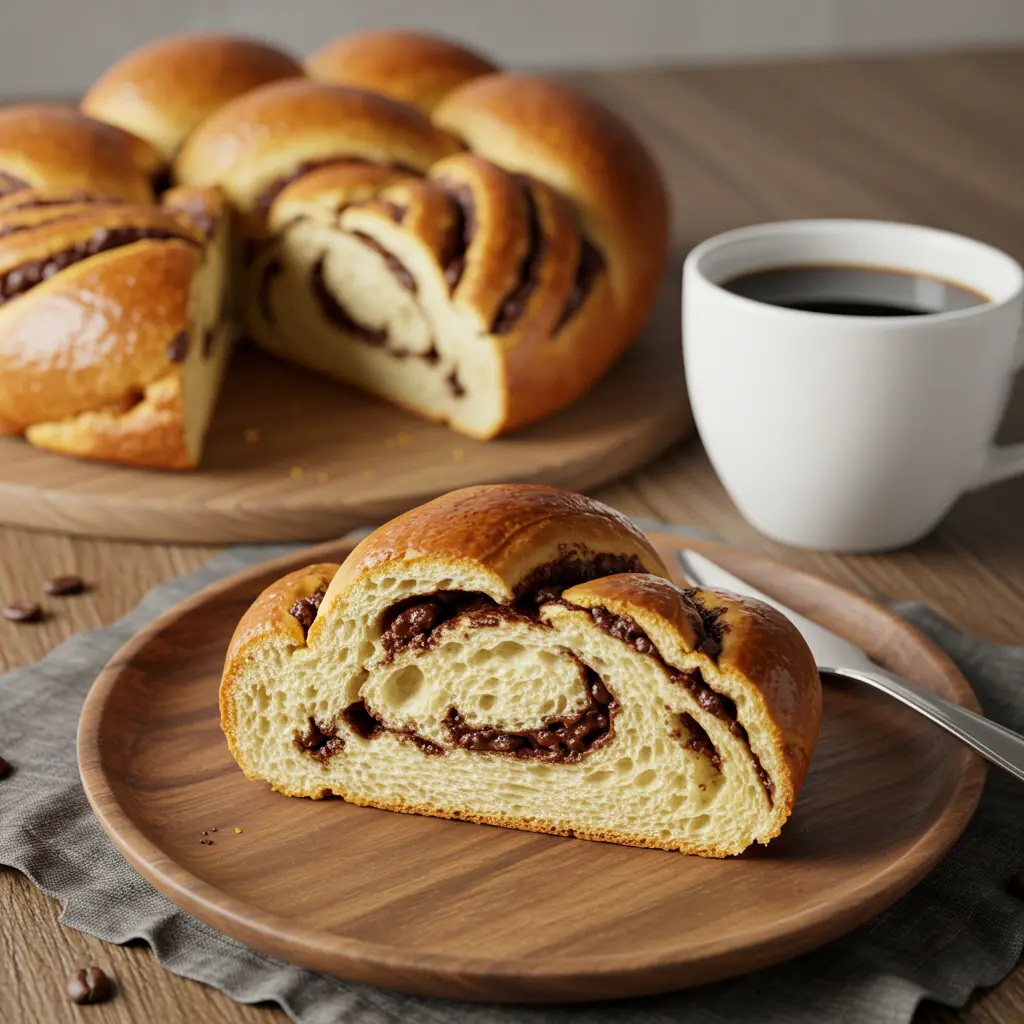
Nothing compares to the heavenly aroma of freshly baked braided chocolate chip brioche wafting through your kitchen. This indulgent, French-inspired sweet bread is enriched with butter, eggs, and milk, creating an airy, pillowy texture with a golden crust. When combined with melty chocolate chips, it becomes a treat that’s impossible to resist!
But here’s the best part—making homemade brioche isn’t as intimidating as it seems. With a little patience and technique, you’ll master the art of kneading, proofing, and braiding like a pro. Whether you’re enjoying it fresh from the oven, toasted with a spread of butter, or as the base for French toast, this brioche will quickly become a household favorite.
Let’s dive into the world of braided chocolate chip brioche, exploring its rich history, essential ingredients, and step-by-step instructions to ensure your bread turns out perfectly golden and fluffy every time.
Part 1: Introduction to Braided Chocolate Chip Brioche
The Allure of Homemade Brioche
If you’ve ever bitten into a slice of brioche bread, you know it’s unlike any ordinary loaf. Soft yet rich, slightly sweet yet buttery—it’s the perfect harmony of texture and flavor. Traditionally, brioche has been a staple in French bakeries for centuries, often enjoyed as breakfast or a teatime treat.
But why settle for store-bought when you can create a homemade brioche that’s fresher, softer, and more satisfying? Making it from scratch allows you to control the quality of ingredients, adjust sweetness levels, and even experiment with fillings like chocolate, cinnamon, or nuts. Plus, there’s something deeply rewarding about watching your dough rise and transform into a beautifully braided masterpiece.
Combining Tradition with Sweet Indulgence
The magic happens when you take a classic brioche dough and infuse it with melty chocolate chips. The result? A slightly sweet, buttery loaf with pockets of gooey chocolate in every bite. Unlike typical sweet breads, this one isn’t overpoweringly sugary, making it perfect for breakfast, brunch, or an afternoon snack.
Braiding the dough not only gives it a stunning bakery-style appearance but also helps distribute the chocolate chips evenly, ensuring each slice is just as delicious as the last. And while it may look intricate, the braiding process is simpler than you think—we’ll walk you through it step by step!
Stay tuned as we dive into the fascinating history of brioche, why its unique texture stands out, and how you can master this recipe in your own kitchen!
Part 2: Understanding Brioche
What is Brioche?
Brioche is no ordinary bread—it’s an enriched, tender, and slightly sweet French pastry bread that stands out for its golden crust and soft, airy crumb. Unlike traditional bread, which primarily consists of flour, water, yeast, and salt, brioche dough is enriched with eggs, butter, and milk, giving it a rich, almost cake-like texture.
Though brioche may seem like an extravagant treat reserved for special occasions, it has long been a staple in French bakeries and households, commonly enjoyed as breakfast, dessert, or even transformed into decadent dishes like French toast and bread pudding. When combined with chocolate chips, brioche becomes an irresistible fusion of indulgence and tradition, perfect for any time of the day.
But what makes this bread so unique? To understand, let’s explore its fascinating history and signature characteristics that set it apart from regular loaves.
Origins and History of Brioche
Brioche dates back to 17th-century France, where it was originally considered a luxury bread due to its high butter and egg content. The name brioche is believed to have derived from the Old Norman word brier, meaning “to knead,” which speaks to the importance of proper dough handling in achieving its signature fluffiness.
While the origins of brioche remain somewhat debated, historical references link it to Normandy, a region renowned for its high-quality butter and dairy products. This explains why traditional brioche recipes call for generous amounts of butter, making it richer than standard bread varieties.
Over time, brioche became a beloved staple across France, evolving into various shapes and flavors. Some of the most popular versions include brioche à tête (a small, round brioche with a “head” on top), brioche Nanterre (a rectangular loaf), and, of course, braided brioche, which not only looks stunning but also provides an even distribution of flavors—especially when chocolate chips are added!
Characteristics of Brioche Dough
Enriched Dough Explained
Unlike lean doughs used for baguettes or sandwich bread, brioche dough is classified as an enriched dough because it contains butter, eggs, and milk. These ingredients slow down gluten development, making the bread more tender and delicate rather than chewy.
This means that kneading and proofing times are longer than for regular bread, as the dough requires extra time to develop strength and structure while maintaining its soft, buttery richness. The high-fat content also makes the dough a little sticky, but don’t worry—that’s exactly how it should be!
Texture and Flavor Profile
One bite of freshly baked brioche reveals its distinctively light, airy texture, achieved through proper proofing and gentle kneading. The bread has a slightly sweet flavor, enhanced by rich dairy notes and a buttery mouthfeel.
When baked, the crust turns a beautiful deep golden brown, thanks to the egg wash applied before baking. This not only adds a glossy finish but also contributes to a delicate crispness that contrasts beautifully with the soft interior.
Now that we understand what makes brioche so special, let’s take a closer look at the art of braiding, and why it’s more than just a decorative touch!
Part 3: The Appeal of Braiding
The Art and Purpose of Braiding Bread
Braiding bread isn’t just about aesthetics—it plays a crucial role in the baking process, texture, and cultural significance of many bread varieties. From traditional challah to soft, sweet brioche, braiding provides both structural and functional benefits while adding a touch of artisan craftsmanship to homemade loaves.
When you braid brioche dough, you’re not only shaping it into a beautiful loaf but also creating a more even baking process. The interwoven strands allow air and heat to circulate better, resulting in a loaf that’s light, evenly baked, and visually stunning.
But beyond the practical advantages, braided bread carries deep cultural roots, symbolizing everything from unity and celebration to prosperity and tradition in various societies worldwide.
Aesthetic and Functional Benefits
A braided brioche loaf has an undeniable charm that immediately elevates its presentation. Whether served at a brunch table, holiday gathering, or casual breakfast, its intricate design makes it feel special—even before you take the first bite!
But there’s more to braiding than just looks. The process also helps:
- Distribute Chocolate Chips Evenly: Instead of sinking to the bottom, chocolate chips are layered throughout the dough as you braid, ensuring every bite has a perfect balance of sweetness.
- Enhance the Bread’s Structure: Braiding creates multiple layers of dough, which helps trap steam during baking, resulting in a softer, fluffier texture.
- Improve Bake Consistency: Because braiding prevents the dough from forming a single dense mass, the heat circulates more evenly, leading to a loaf that’s baked perfectly throughout.
Cultural Significance of Braided Breads
Braided breads have been part of culinary traditions across the world, often carrying symbolic meanings and historical significance.
- In Jewish culture, challah bread is braided to represent unity and blessings, traditionally eaten on Sabbath and holidays.
- In Scandinavian and Eastern European countries, braided sweet breads are often associated with festivities, religious ceremonies, and family gatherings.
- In French baking traditions, braided brioche is an elegant variation of the classic loaf, often used in celebratory feasts or high-end pâtisseries.
So, while braiding brioche makes it look more refined, it also connects the modern baker to centuries-old traditions of shaping and perfecting bread.
Now that we understand the why behind braiding, it’s time to dive into the most exciting part—choosing the right ingredients and preparing the perfect braided chocolate chip brioche dough!
Part 4: Incorporating Chocolate Chips
Enhancing Brioche with Chocolate Chips
A classic brioche loaf is already a masterpiece with its buttery softness and airy crumb, but adding chocolate chips takes it to a whole new level. The slight bitterness of dark chocolate or the creamy sweetness of milk chocolate perfectly complements brioche’s rich, eggy flavor. Each bite becomes a delightful contrast between pillowy bread and melty chocolate, making it an irresistible treat for breakfast, brunch, or dessert.
But not all chocolate chips are created equal. The choice between dark, milk, or even white chocolate can significantly impact the sweetness and depth of flavor in your braided chocolate chip brioche. Additionally, the way you distribute the chocolate in the dough will determine whether your brioche has balanced flavors or ends up with chocolate-heavy pockets. Let’s break it down!
Choosing the Right Chocolate
Dark vs. Milk Chocolate
The decision between dark and milk chocolate depends on personal preference:
- Dark Chocolate (60-70% cocoa): Provides a deep, slightly bitter flavor that contrasts beautifully with brioche’s mild sweetness. It melts smoothly, adding richness without overpowering the bread.
- Milk Chocolate (30-40% cocoa): Sweeter and creamier, perfect for those who prefer a more dessert-like brioche. However, it may melt faster and create gooey pockets, which some love and others may find too messy.
- White Chocolate: Less common but adds a creamy, caramel-like sweetness. It doesn’t melt as smoothly as dark or milk chocolate, so it’s often used in chunks rather than chips.
Quality Considerations
Since chocolate is one of the star ingredients, choosing high-quality chocolate chips or chopped chocolate is crucial. Here’s what to look for:
- Cocoa Content: Opt for chocolate with at least 50% cocoa solids for balanced flavor and good meltability.
- No Wax or Fillers: Avoid low-quality baking chips that contain stabilizers, as they don’t melt properly. Instead, choose chocolate baking bars and chop them yourself for a gourmet touch.
- Bittersweet or Semi-Sweet Chocolate: These options work well for those who want a balance between sweetness and depth.
Distribution Techniques for Even Flavor
Simply tossing chocolate chips into brioche dough may seem straightforward, but without proper distribution, you might end up with uneven clumps of chocolate in some areas while others remain bare. Here’s how to ensure every slice is perfectly balanced:
- Fold Chocolate in Gradually: Instead of mixing all the chocolate at once, incorporate it in layers during the kneading process to avoid clumping.
- Use the Freezer Trick: If your chocolate tends to melt too quickly while kneading, freeze the chips for 15-20 minutes before adding them to the dough. This helps maintain their shape during baking.
- Braid for Even Distribution: Braiding naturally spreads chocolate throughout the loaf, ensuring every slice has the right amount of sweetness.
Now that we’ve perfected the chocolate chip selection and distribution, let’s dive into the essential ingredients needed to create this buttery, pillowy masterpiece.
Part 5: Ingredients Overview
Essential Ingredients for Braided Chocolate Chip Brioche
The beauty of brioche dough lies in its simplicity. While it contains just a handful of ingredients, each plays a critical role in achieving its soft, enriched texture. Let’s take a closer look at what makes this brioche recipe work so perfectly.
Flour Selection
Flour is the foundation of any bread, and choosing the right type affects texture, structure, and gluten development.
- Bread Flour: The best option for brioche due to its higher protein content (12-14%), which helps build a strong gluten network, giving the bread its signature soft chewiness.
- All-Purpose Flour: Can be used as an alternative, but it has less protein, which may result in a slightly less structured brioche.
Yeast Types and Their Roles
Yeast is what makes brioche rise and develop complex flavors. There are two main options:
- Active Dry Yeast: Needs to be bloomed in warm milk before mixing into the dough. This process ensures that the yeast is fully activated and ready to create that pillowy texture.
- Instant Yeast: A quicker option that can be mixed directly into the flour. It’s more potent, which means shorter proofing times.
Whichever you choose, make sure your yeast is fresh, as expired yeast will result in a dense, under-risen loaf.
Sugar and Sweeteners
Sugar is essential for:
- Feeding the yeast to promote a strong rise.
- Enhancing the slight sweetness of brioche.
- Contributing to the golden crust during baking.
Most recipes use granulated sugar, but for a deeper flavor, you can experiment with honey or brown sugar.
Dairy Components: Milk and Butter
Milk and butter are what make brioche truly luxurious.
- Milk: Adds richness and tenderness, while also activating the yeast. Using whole milk ensures a softer, more flavorful dough.
- Butter: The heart of brioche, butter gives the bread its melt-in-your-mouth texture. Always use high-quality unsalted butter, added gradually so it fully incorporates into the dough.
Eggs: Binding and Enrichment
Eggs are what give brioche its beautiful golden hue and velvety crumb. They:
- Help bind the dough together.
- Enrich the bread, making it more tender and flavorful.
- Create a soft, rich texture that sets brioche apart from regular bread.
For best results, use room-temperature eggs, as cold eggs can slow down the rising process.
Salt: Flavor Enhancement
While often overlooked, salt is essential for:
- Enhancing the overall flavor.
- Controlling yeast fermentation, ensuring the dough doesn’t rise too quickly.
- Strengthening the gluten network, which helps achieve a stable structure.
Always use fine sea salt, as larger grains don’t dissolve evenly in the dough.
Chocolate Chips: Quality and Quantity
The star of this braided brioche! As mentioned earlier, using high-quality dark or milk chocolate is key, but how much should you add?
- 100-150g (½ to ¾ cup) of chocolate chips is ideal—enough for chocolate in every bite, but not so much that it overwhelms the delicate flavor of the brioche.
- You can also mix in chocolate chunks for added texture and flavor contrast.
Now that we’ve covered all the key ingredients, it’s time to roll up our sleeves and start making the perfect braided chocolate chip brioche! Let’s dive into the step-by-step process of crafting this irresistible treat.
Part 6: Equipment Needed
Tools and Equipment for Baking Brioche
Baking the perfect braided chocolate chip brioche requires more than just high-quality ingredients. Using the right tools ensures that your dough is kneaded properly, proofed at the correct temperature, and baked evenly. While some tools are essential, others simply make the process easier and more precise.
Mixing Tools
To achieve a smooth, elastic brioche dough, proper mixing is crucial. Here’s what you’ll need:
- Stand Mixer with a Dough Hook – Brioche dough is rich and sticky, requiring extensive kneading. A stand mixer makes the process effortless, developing the gluten structure while evenly incorporating butter.
- Large Mixing Bowl – If kneading by hand, a sturdy, spacious bowl is essential for comfortably working the dough.
- Silicone Spatula or Bench Scraper – Helps scrape sticky dough from surfaces and fold in chocolate chips evenly.
Proofing Containers
Brioche dough undergoes two proofing stages, so using the right containers ensures proper rise:
- Glass or Stainless Steel Bowl – Ideal for the first rise, as these materials help maintain a consistent temperature.
- Plastic Wrap or Damp Kitchen Towel – Covers the dough during proofing, preventing it from drying out.
- Proofing Box or Warm Oven – If your kitchen is cold, a proofing box or oven with the light on creates a stable, warm environment for the dough to rise.
Baking Pans and Ovens
Brioche needs even baking to achieve a golden crust and soft interior:
- Baking Sheet with Parchment Paper – A large sheet pan is ideal for free-form braided loaves, ensuring even heat circulation.
- Loaf Pan (Optional) – If you prefer a more structured shape, a 9×5-inch loaf pan helps contain the rise.
- Conventional or Convection Oven – A steady, preheated oven (at 175°C/350°F) ensures even baking. Convection ovens bake faster due to hot air circulation, so adjust the time accordingly.
Optional Tools for Precision
While not essential, these tools improve accuracy and consistency:
- Kitchen Scale – Weighing ingredients ensures precision, leading to consistent results.
- Instant-Read Thermometer – Measures the dough temperature (ideal: 24°C/75°F) and checks doneness (brioche should reach 88°C/190°F internally).
- Pastry Brush – Used for applying an egg wash, giving the brioche its signature glossy finish.
- Cooling Rack – Prevents the bottom of the brioche from becoming soggy after baking.
With all the right tools in place, it’s time to move on to the most exciting part—baking the perfect braided chocolate chip brioche!
Part 7: Step-by-Step Recipe
Braided Chocolate Chip Brioche Recipe
Now that we’ve covered the ingredients and equipment, let’s walk through the step-by-step process of making this rich, buttery, and chocolate-filled brioche.
Detailed List of Ingredients
Quantities and Specifications
Here’s what you’ll need for one large loaf or two small loaves:
- 3 ½ cups (440g) bread flour (provides structure and chewiness)
- ¼ cup (50g) granulated sugar (adds slight sweetness and aids yeast activation)
- 1 packet (2 ¼ tsp) active dry yeast (or instant yeast, for faster rise)
- ½ cup (120ml) whole milk, warm (110°F/43°C) (activates yeast and enriches dough)
- 3 large eggs, room temperature (binds ingredients and creates a soft crumb)
- ½ cup (113g) unsalted butter, softened (adds richness and tenderizes the dough)
- ½ teaspoon fine sea salt (balances sweetness and strengthens gluten structure)
- ¾ cup (150g) high-quality chocolate chips (dark, milk, or a mix, depending on preference)
- 1 egg + 1 tablespoon milk (for egg wash) (creates a glossy, golden crust)
Now, let’s get baking!
Expanded Cooking Instructions
Preparing the Dough
- Activate the Yeast – In a small bowl, whisk together warm milk, yeast, and 1 tablespoon of sugar. Let sit for 5-10 minutes until it becomes frothy. If no bubbles form, your yeast is inactive—start again with fresh yeast.
- Mix Dry Ingredients – In a large mixing bowl, combine flour, remaining sugar, and salt.
- Incorporate Wet Ingredients – Add yeast mixture and eggs to the flour mixture. Mix on low speed using a stand mixer with a dough hook (or mix by hand with a spatula).
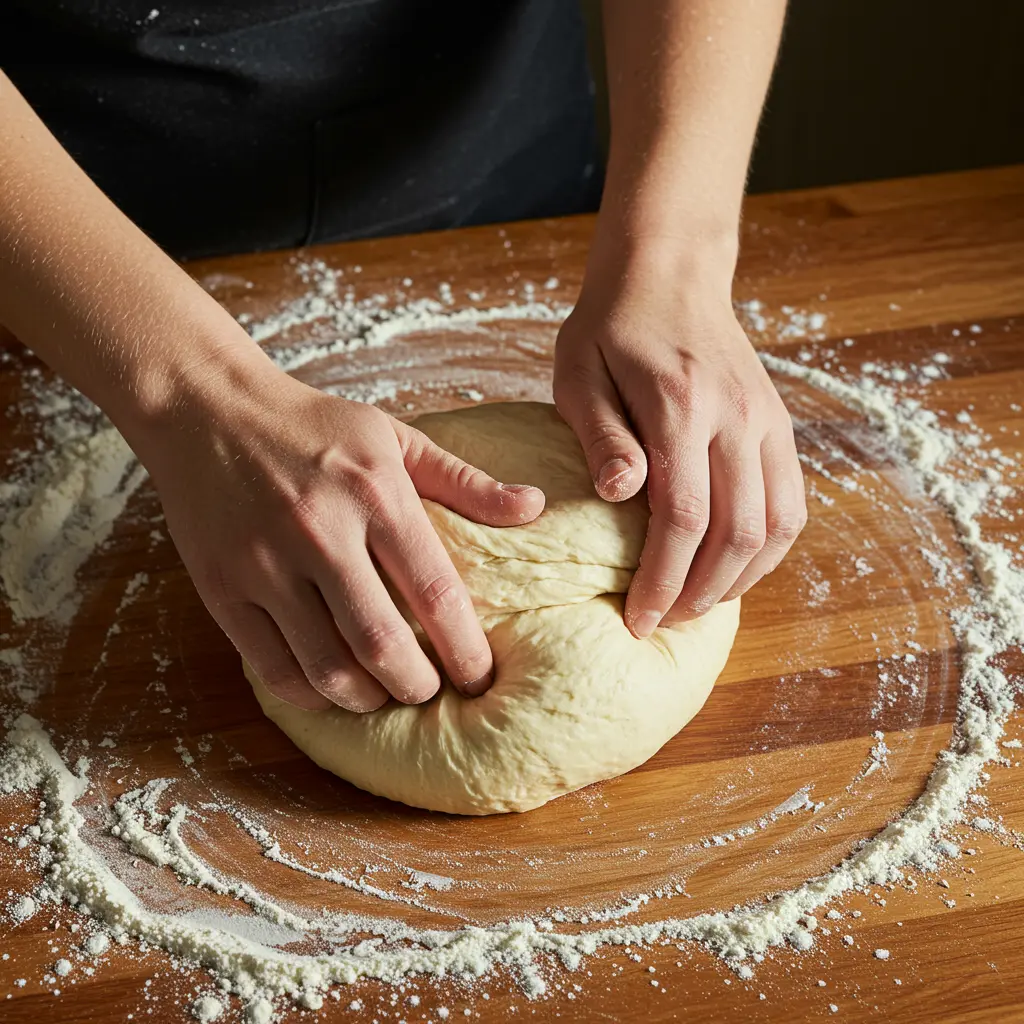
- Add Butter Gradually – Once a shaggy dough forms, add softened butter one tablespoon at a time. Knead for 10-12 minutes until the dough is smooth, slightly sticky, and elastic.
First Proofing
- Transfer the dough to a greased bowl and cover with plastic wrap or a damp towel.
- Let it rise in a warm place for 1.5 to 2 hours, or until doubled in size.
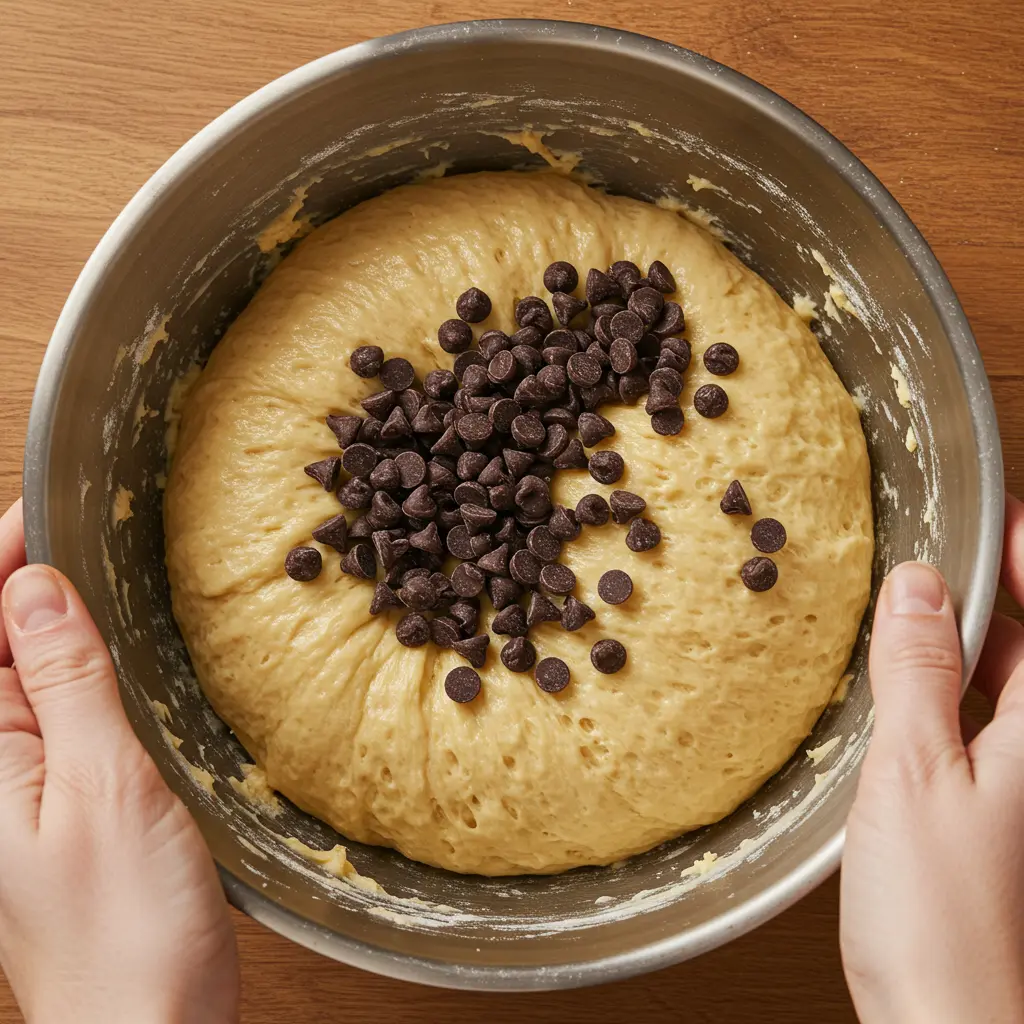
Incorporating Chocolate Chips
- Once risen, punch down the dough and transfer it to a lightly floured surface.
- Gently knead in the chocolate chips, folding and pressing to ensure even distribution.
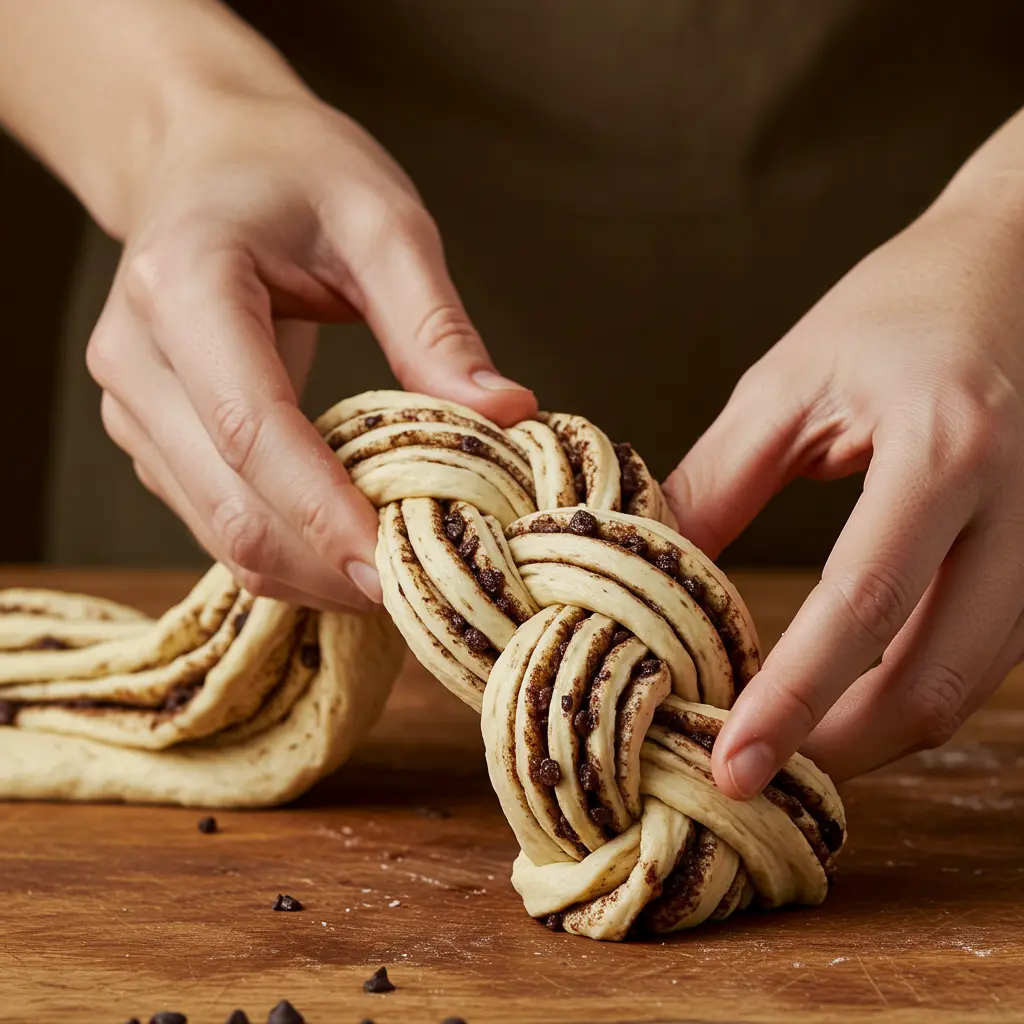
Braiding Technique
- Divide the dough into three equal portions.
- Roll each piece into a 12-inch (30cm) rope.
- Place the ropes side by side and pinch them together at the top.
- Braid the dough by alternating the strands, tucking the ends under.
- Transfer to a parchment-lined baking sheet or loaf pan.
Second Proofing
- Cover the braided dough with a towel and let it proof for 45 minutes to 1 hour, until puffy.
- Meanwhile, preheat the oven to 350°F (175°C).
Baking Process
- Brush the top with an egg wash (whisked egg + milk) for a shiny crust.
- Bake for 25-30 minutes, until deep golden brown and the internal temperature reaches 190°F (88°C).
- If the top browns too quickly, tent it with aluminum foil halfway through baking.
Cooling and Serving Suggestions
- Let the brioche cool on a wire rack for at least 20 minutes before slicing.
- Enjoy warm or at room temperature with butter, honey, or jam.
- Store leftovers in an airtight container for 3-4 days or freeze for up to 2 months.
With a crispy golden crust, pillowy interior, and rich chocolatey bursts, this braided chocolate chip brioche is guaranteed to impress!
Next, we’ll dive into the nutritional breakdown to see just how this indulgent treat fits into your diet.
Part 8: Nutritional Information
Nutritional Content of Braided Chocolate Chip Brioche (per 100g)
Brioche is an indulgent bread, thanks to its buttery, egg-rich dough and the addition of chocolate chips. While it’s certainly a treat, understanding its nutritional profile can help you enjoy it mindfully. Below is the estimated nutritional breakdown for 100g of braided chocolate chip brioche.
Caloric Breakdown
A 100g serving of braided chocolate chip brioche contains approximately:
- Calories: ~330 kcal
- From Carbohydrates: 55%
- From Fats: 38%
- From Proteins: 7%
Macronutrients
| Macronutrient | Amount per 100g |
|---|---|
| Carbohydrates | ~45g |
| Sugars | ~10g |
| Dietary Fiber | ~2g |
| Proteins | ~7g |
| Total Fats | ~14g |
| Saturated Fats | ~8g |
| Cholesterol | ~85mg |
Micronutrients
While brioche isn’t a superfood, it does contain important vitamins and minerals, mainly from eggs, butter, and flour.
| Micronutrient | Amount per 100g |
|---|---|
| Vitamin A | 8-10% DV |
| Calcium | 4% DV |
| Iron | 8% DV |
| Magnesium | 3% DV |
| Sodium | 200mg (8% DV) |
Since brioche is high in butter and sugar, it’s best enjoyed in moderation as part of a balanced diet. Pairing it with protein-rich spreads (like peanut butter) or fiber-rich fruits can make it more nutritionally balanced.
Now that you know its nutritional content, let’s explore some expert tips to make sure your brioche turns out perfect every time!
Part 9: Tips and Tricks
Expert Tips for Perfect Brioche
Mastering braided chocolate chip brioche requires precision, patience, and a few tricks of the trade. Whether you’re a beginner or an experienced baker, these pro tips will help you achieve bakery-quality brioche at home!
Ensuring Proper Dough Consistency
- Brioche dough is soft and slightly sticky—don’t be tempted to add too much flour, or you’ll end up with a dense loaf.
- Knead until the dough becomes smooth and elastic—this usually takes 10-12 minutes in a stand mixer or 15-20 minutes by hand.
- If the dough feels too sticky, chill it for 30 minutes before handling—it firms up and becomes easier to work with.
Optimal Proofing Conditions
- First Rise: Let the dough rise in a warm, draft-free spot until doubled in size. If your kitchen is cold, place it in a slightly warmed (but off) oven with the light on.
- Second Rise: After braiding, let the dough proof for at least 45 minutes. A well-proofed brioche will feel light and airy when gently poked.
- Avoid Over-Proofing: If the dough rises too long, it can collapse in the oven, resulting in a dense loaf.
Achieving the Ideal Bake
- Egg Wash Matters: Brushing the loaf with a mix of egg + milk gives it that signature golden shine.
- Watch the Oven: If the top browns too quickly, cover it loosely with foil halfway through baking.
- Temperature Check: Brioche is fully baked when it reaches 190°F (88°C) internally. Use an instant-read thermometer for accuracy.
With these expert tips, you’re well on your way to baking the perfect braided chocolate chip brioche! Next, let’s explore common mistakes to avoid so you don’t fall into any baking pitfalls.
Part 10: Common Mistakes to Avoid
Pitfalls in Baking Braided Chocolate Chip Brioche
Even the most experienced bakers can run into trouble when making braided chocolate chip brioche. From dough mishaps to baking blunders, small errors can lead to dense loaves, uneven braids, or burnt crusts. To ensure your brioche turns out soft, fluffy, and golden, here are some common mistakes to watch out for.
Overproofing or Underproofing
Proofing is one of the most critical steps in baking brioche.
- Underproofed Dough: If the dough hasn’t risen enough, the brioche will be dense and heavy. You’ll know it’s underproofed if it springs back immediately when gently poked.
- Overproofed Dough: If left too long, the yeast overworks, causing the dough to collapse during baking. If the dough deflates when touched, it’s overproofed.
- Fix It: Aim for 1.5–2 hours for the first rise and 45 minutes to 1 hour after braiding. The dough should feel light and puffy but still hold its shape.
Incorrect Ingredient Measurements
Baking is a science, and even small variations in ingredient amounts can affect the final texture.
- Too Much Flour: Makes the brioche dense and dry. Instead of scooping flour straight from the bag, spoon it into a measuring cup and level it off or, better yet, use a kitchen scale.
- Too Little Butter or Eggs: Results in a less tender brioche since these ingredients enrich the dough. Always use room-temperature butter and eggs for proper incorporation.
- Fix It: Measure precisely and avoid unnecessary ingredient swaps.
Baking at Improper Temperatures
- Oven Too Hot: The outside browns too quickly while the inside remains doughy.
- Oven Too Cool: The loaf won’t rise properly, resulting in a dense or gummy texture.
- Fix It: Preheat your oven to 350°F (175°C) and use an oven thermometer to ensure accuracy. If the top browns too fast, cover it with foil halfway through baking.
Now that you know what not to do, let’s explore exciting variations and substitutions to personalize your brioche!
Part 11: Variations and Substitutions
Creative Twists on the Classic Recipe
While braided chocolate chip brioche is already heavenly, you can experiment with different fillings and ingredient swaps to create unique flavors. Whether you want a decadent swirl, a healthier twist, or a diet-friendly version, these variations will inspire you to get creative in the kitchen!
Alternative Fillings
If you want to mix things up, try these delicious filling variations.
Nutella Swirl
- Swap chocolate chips for a Nutella filling.
- After rolling out the dough, spread a thin layer of Nutella before braiding.
- The result? A rich, gooey brioche with irresistible chocolate-hazelnut flavor.
Cinnamon and Raisins
- Replace chocolate chips with ½ cup of raisins.
- Add 1 teaspoon of cinnamon to the dry ingredients for a warm, spiced flavor.
- This variation is perfect for a cozy, autumn-inspired twist.
Dietary Substitutions
Need a gluten-free or dairy-free option? No problem!
Gluten-Free Options
- Substitute bread flour with a 1:1 gluten-free baking flour blend.
- Add 1 teaspoon of xanthan gum to help mimic brioche’s elasticity.
- Expect a slightly denser texture, but still delicious!
Dairy-Free Alternatives
- Swap butter for vegan butter or coconut oil.
- Use almond, soy, or oat milk instead of regular milk.
- Opt for dairy-free chocolate chips for a fully lactose-free treat.
With these variations, you can customize your brioche to suit your taste and dietary needs! Up next, we’ll explore the best ways to serve and store your homemade brioche!
Part 12: Serving Suggestions
Pairing and Presentation Ideas
A freshly baked braided chocolate chip brioche is a showstopper on its own, but the right accompaniments and presentation can take it to the next level. Whether you’re serving it as breakfast, brunch, or dessert, pairing it with the perfect spread or beverage will enhance its buttery richness and chocolatey goodness.
Accompaniments
Spreads and Toppings
While brioche is delicious plain, adding a spread can elevate its flavor and texture:
- Butter & Honey – A classic combination that enhances brioche’s rich, eggy flavor.
- Nut Butters – Almond or peanut butter adds protein and a nutty contrast to the sweet chocolate chips.
- Fruit Preserves – Raspberry, apricot, or strawberry jam provides a tangy balance to the sweet bread.
- Mascarpone or Cream Cheese – Adds a creamy, slightly tangy contrast that pairs beautifully with the chocolate.
Beverage Pairings
The right drink can complement brioche’s soft, buttery crumb and chocolatey bites:
- Hot Chocolate – The ultimate indulgence, pairing chocolate with chocolate for a cozy treat.
- Coffee or Espresso – The bitterness of coffee balances the sweetness of brioche.
- Milk – A simple cold glass of milk enhances the creaminess of the chocolate chips.
- Herbal Teas – Chamomile or vanilla tea complements brioche’s delicate sweetness without overpowering it.
Presentation Tips
Plating for Aesthetic Appeal
A beautiful loaf deserves a stunning presentation. Try these simple plating tips:
- Slice at an Angle – Show off the braided layers and chocolate-filled interior.
- Dust with Powdered Sugar – A light sprinkle adds an elegant bakery-style finish.
- Serve on a Wooden Board – Creates a rustic, artisanal look.
- Garnish with Fresh Berries – Adds color and a fresh, tart contrast to the rich brioche.
Whether served warm with butter or turned into a gourmet French toast, this braided chocolate chip brioche is guaranteed to impress! But how do you store it properly to maintain its soft, fluffy texture? Let’s find out.
Part 13: Storage and Shelf Life
Preserving Freshness of Brioche
Brioche is best enjoyed fresh, but with proper storage, you can keep it soft and flavorful for days. Whether you plan to eat it within a few days or save it for later, these storage tips will ensure it stays just as delicious as the day it was baked.
Short-Term Storage
If you plan to enjoy your brioche within 2–3 days:
- Store it at room temperature in an airtight container or wrapped in plastic wrap to prevent it from drying out.
- Avoid refrigerating brioche—it can cause the bread to become stale faster.
- If the brioche starts to lose moisture, refresh it by warming it in the oven for a few minutes.
Freezing for Extended Shelf Life
To keep your brioche fresh for up to 2 months:
- Slice the loaf before freezing to make thawing and serving easier.
- Wrap each slice tightly in plastic wrap, then place in a freezer-safe bag.
- To thaw, let it sit at room temperature for 30 minutes, or reheat directly from frozen.
Reheating Techniques
For that fresh-out-of-the-oven taste:
- Oven: Wrap in foil and warm at 325°F (165°C) for 5–7 minutes.
- Toaster: Lightly toast for a crispier exterior and soft, warm interior.
- Microwave: Heat for 10–15 seconds for a quick, warm bite.
With these storage and reheating tips, you can enjoy your homemade braided chocolate chip brioche anytime! Next, we’ll tackle frequently asked questions to help you perfect your bake.
Part 14: Frequently Asked Questions
FAQs about Braided Chocolate Chip Brioche
Baking braided chocolate chip brioche can raise many questions, especially if you’re making it for the first time. Below, we’ve answered some of the most common queries to help you achieve the perfect loaf!
Can I use instant yeast instead of active dry yeast?
Yes! You can swap active dry yeast for instant yeast without any issues. The main difference is that instant yeast doesn’t need to be activated in warm milk before mixing. Simply add it directly to the dry ingredients. However, if using active dry yeast, always proof it first to ensure it’s still alive and active.
How do I prevent the chocolate chips from sinking?
To keep chocolate chips evenly distributed throughout the dough:
- Toss them in a light dusting of flour before mixing them in. This prevents them from slipping through the dough.
- Don’t over-knead after adding chocolate chips—excess handling can cause them to sink.
- Chill the dough slightly before braiding. This firms up the dough, helping hold the chocolate in place.
What is the best way to reheat leftover brioche?
To restore brioche’s fresh-from-the-oven softness:
- Oven: Wrap in foil and heat at 325°F (165°C) for 5–7 minutes.
- Toaster: Lightly toast for a crispy crust and warm interior.
- Microwave: Warm for 10–15 seconds, but be cautious—microwaving for too long can make it chewy.
Can I prepare the dough in advance?
Yes! You can prepare the dough a day ahead:
- After the first proof, punch down the dough and refrigerate it overnight.
- When ready to bake, let it sit at room temperature for about an hour, then shape, proof, and bake as usual.
- This method allows the flavors to develop even more, resulting in a richer-tasting brioche.
How do I know when the dough has been kneaded enough?
Proper kneading is key to a soft and fluffy brioche. You’ll know it’s ready when:
- The dough becomes smooth, elastic, and slightly sticky but doesn’t stick to your hands excessively.
- You can perform the windowpane test—stretch a small piece of dough between your fingers. If it forms a thin, translucent membrane without tearing, it’s ready!
Is it possible to make this brioche without a stand mixer?
Absolutely! Although a stand mixer makes kneading easier, you can make brioche by hand with patience.
- Mix the ingredients in a large bowl, then transfer to a floured surface.
- Knead for 15–20 minutes, gradually incorporating the butter a little at a time.
- Expect a sticky dough at first—resist adding too much flour. As you knead, it will become smoother and more elastic.
With these expert answers, you’re now fully equipped to tackle braided chocolate chip brioche with confidence!
Part 15: Conclusion
Embracing the Joy of Homemade Braided Chocolate Chip Brioche
Baking braided chocolate chip brioche is more than just a recipe—it’s an experience. From the moment you knead the rich, buttery dough to the aroma filling your kitchen as it bakes, this process is a true labor of love. The result? A soft, golden loaf bursting with pockets of melty chocolate, perfect for sharing with loved ones.
Encouragement to Experiment and Enjoy
Don’t be afraid to experiment! Whether you swap in different chocolates, add swirls of Nutella, or try new fillings, there are endless ways to make this brioche your own. If your first loaf isn’t perfect, keep practicing—each bake brings you closer to mastering the art of brioche.
Invitation to Share Experiences and Feedback
We’d love to hear from you! Have you tried this braided chocolate chip brioche recipe? Did you add your own unique twist? Share your experience in the comments or tag us on social media with your homemade creations.
Now, grab a warm slice, enjoy every bite, and keep baking with joy! 🍞🍫✨